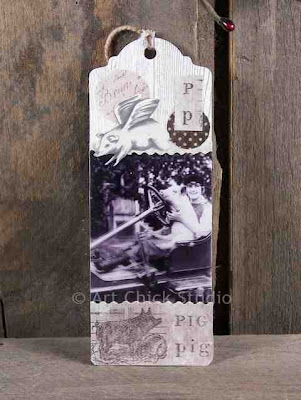
When Pigs Fly and Drive Bookmark

I'm not really sure what prompted me to create this pig-themed altered art bookmark, which I'm calling When Pigs Fly and Drive. I must have gone a little hog wild there for a moment or two. ;)  But I sure had fun making it.

When Pigs Fly Altered Bookmark


I started with a plain white bookmark blank, which I stamped with a wood grain texture rubber stamp. Next I added the vintage photo transparency of the lady and the car-driving pig. Then I remembered seeing some pig-themed paper in a new Tim Holz paper pack that I got recently. So I found that and cut it up a bit.  The pig image at the bottom is part of that paper...so are the P and p at the top of the bookmark. Now the flying pig is from a piece of wallpaper, believe it or not. That fit the theme perfectly. Then I just added some coordinating paper circles, and some grungy twine for the top of the bookmark to finish it off.

I think this is my first animal-themed bookmark. Who knows what might come next!

Believe in Love Ornie

I felt like making an ornie, and decided too that I could incorporate an inchie and use this for an entry into the Gingersnaps Creations Inchies challenge.  This is the result: my Believe in Love Ornie.

Believe in Love Wood Ornie


I started with a simple wood blank, approximately 2x3" in size. I painted it black, then sanded the surface and the edges to give it a distressed look. Next, I stenciled on the word, Believe, in a silver color. Then I took a piece of black and white scrapbook paper and fancied up the edges, and I did the same to part of the packaging for a deck of cards, which is the red and white paper. I glued those pieces together, then found a vintage photo of young lovers sharing a smooch and glued that on top. I adhered them all to the background. I also created a heart out of the same deck of cards packaging and glued that over the "v" in Believe. I finished off the whole thing with a red fabric rosette and some white organdy ribbon.

I think this would look cute on a Christmas Tree, or even hanging on the wall or a peg rack of some sort. And what can I say? I believe in love, so I love playing with that theme any time. Just call me a hopeful romantic.

Caring Hang Tag Magnet

I love playing with ideas for magnets. I made this one awhile ago when I was creating some others, but somehow forgot to post it.

Caring Altered Tag Magnet


I started this with a grungy hangtag, measuring 1-1/2" by 3-1/4".  I used one of my Paper Artsy rubber stamps to stamp on the vintage style image of the woman. Next I dabbed on some distress ink on her face and neck, to give it some more color and depth. Then I distressed a piece of paper and stamped on the word, caring.  And I finished the magnet with a rhinestone gem, to make it look like she's wearing a diamond earring. Then I just needed to adhere it to the magnet. C'est fini! :)

Moments Shabby Chic Hangtag

I was feeling in a bit of a shabby chic mood the other day, so I decided to create an altered hangtag with a shabby chic flair.

Moments Shabby Chic Altered Tag


This tag was plain white to begin with, so I first spritzed it with some rose Glimmer Mist to give it some color and texture.  Next I found a vintage photo of a fairy girl that looked perfect for the tag...and her face reminds me of my oldest niece, Nikki, when she was a little girl. So that made it a great choice too. After I adhered that photo I added some baby blue fabric trim along the bottom of the tag, to contrast and complement the pink mist and roses. Then I added a beautiful pink paper flower to the bottom right corner, and it has a hint of glitter on it to give it some sparkle. I also added some dimensional clock element stickers. And I finished it off with some organdy and pink satin ribbon.

Love it!

Time In a Bottle

OK, who says you can't put time in a bottle?!

Time in a Glass Bottle

Time in a Bottle Glass Art


I'm not sure what inspired me to create this little glass bottle of art, but something sure did. I started with a corked glass vial that is about 2-1/2" high and 1/2" in diameter. I added a little sand...that came straight from the shores of Lake Michigan. Then I stamped the word Time and slightly distressed some purple scrapbook paper and dropped it in the bottle. I finished it with some silver-colored jewelery wire, and some Swarovski crystal beads to add a touch of glam.  This would make a cute novelty gift. :)

You see? You can put Time in a bottle!