4 Princesses Altered Hang Tag

OK, this has to be my biggest altered hangtag to date. It's huge! 4" wide by 7" high, to be exact. It's nice to have one this size because it allowed me to use a much bigger vintage photo image than I normally can do on smaller hangtags. I'm using this for the Gingersnap Creations Black & Red Challenge as well.

4 Princesses Altered Tag


The tag itself already had the black design motif printed on it, and I love the elegant feel that creates for the tag. I added a vintage photo transparency image of 4 ladies in tiaras. They may not be real princesses, but hey, aren't all women entitled to feel like a princess once in awhile?! I framed the transparency with some deep burgundy red fabric trim, and I added a lovely burgundy rose sticker near the top of the tag. I finished it off with a burgundy satin ribbon.

This tag looks just how I hoped it would: simple and elegant.

Gypsy Ladies Glass Tile Magnets

Here are more results of my experimentation in creating glass tile magnets. These are three sets of magnets. [Some of these pics don't look perfectly clear, but the magnets themselves are very clear. These are just so small it was difficult to get a good, clear shot.]


Gypsy Glass Tile Magnets 1

Gypsy Glass Tile Magnets 2

Gypsy Glass Tile Magnets 3


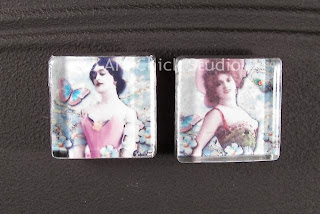
These are all made with clear 1" glass tiles, to which I've affixed vintage photos with some silver-toned foil tape. The photos come from the Itkupilli blog shoppe; the women in the photos look like gypsies to me, and they are surrounded by flowers, greenery, and butterflies. All the tiles have heavy duty round magnets on the back. Love them!

Flower Ladies Glass Tile Magnets

I've just begun to make some glass tile magnets and I'm really having fun with them. I'm using vintage photos and images on them and I love the look of them. Here are my first two sets.

Flower Ladies Glass Tile Magnets

Flower Ladies Glass Tile Magnets


I started with clear glass tiles that are 1" square. The vintage photos I used are from the Itkupilli blog shoppe.  I used silver-toned foil tape to affix the images to the tiles, as well as to finish off the edges of the tiles themselves. Then I added a heavy duty round magnet to the back. Voila. So easy!

I am also going to be making some soldered glass tile magnets, but I wanted to start with something a bit more simple to get my feet wet. I do love how they look, and how easy they were to create.

2 of Spades ATC

Awhile back I created the first ATC I'd planned to do from a deck of playing cards. That was the 3 of Hearts ATC. So I thought it was about time I alter another card in the deck...after all, there are a lot of cards in the deck waiting to be altered! So here's what I did.

2 of Spades Altered Art ATC

I used a Glimmer Mist on the card itself. Wasn't sure how that would turn out since the card's surface is very slick, and it was starting to puddle up on me. So I decided to break out the heat gun and help speed up the dry time. When that was done, I really liked the background; it's very fluid and freeform-looking. And up close, the card does have a nice shimmer to it now, which I like a lot.  Next I added a vintage photo of a fairy girl, who has pink and purple wings.  I added a coordinating butterfly image on the fairy girl, and then I added some purple daisy stickers in the empty opposite corners. I finished the ATC off by adding some pink rhinestone gems to the daisies and to the butterfly.

OK, so 2 altered playing cards down...only 50 to go!


Fly Altered Bookmark

This bookmark features a pretty little vintage photo of a fairy girl, who appears to be thinking about flying away.

Flower Girl Altered Art Bookmark


The background of the bookmark is a patterned cardstock paper; it has a neat pattern combined with old text and distressing in creams and hints of green. I added the fairy girl, and then directly under her added some coordinating paper that has a stitched look. I also added a fabric flower with a bronze brad to accent the fairy. I also added some alphas to spell out the word FLY.  And under that I added a pretty butterfly sticker. I finished it with some gold organdy ribbon.

Paris Altered Bookmark

I made another altered bookmark, following one of my favorite themes: Paris.  I love the whole idea of Paris and hope one day I can visit there to see it in person.

Paris Altered Art Bookmark


The background is a cardstock paper with a brown and turquoise pattern that appears to have a texture to it.  I love the aged look that creates for the bookmark. To the bookmark background I added a vintage photo of a woman, a vintage photo of the Eiffel Tower and an image of some letters, all of which have distressed edges.  Along the bottom of the tag I added some torn and distressed paper with a sticker that reads, Paris.  And I finished it off with a coordinating brown satin ribbon at the top.

Spells Altered Journal

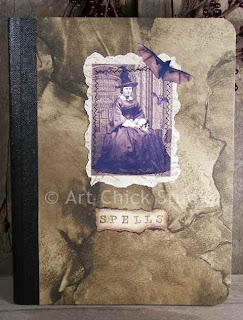
This altered journal is full sized, made using a standard composition book. I was feeling in quite the witchy mood when I made it, so it seemed appropriate at the time.


Spells Altered Art Journal


For the background of this altered journal, I actually used a piece of wallpaper from my old wallpaper collection. I loved the look and feel of it, and it seemed just right for this book of Spells.  I used a great vintage photo of a woman, wearing a witch hat, which I stitched onto some coordinating scrapbook paper to compliment the background.  I also added an extra bat photo to the upper right of the witch photo. Then underneath the main image I created the Spells title by stamping the letters onto torn and distressed cardstock.

This one was really fun to create, and different from the fairy images I love to use so much. I really love how it turned out.

Time Stands Still Altered Journal

This is another mini altered journal I created for the store (soon to open!).

Time Stands Still Altered Journal


The cover of the journal has a black and creamy paisley design motif. To that I added a vintage photo of a fairy girl, who's wearing a green hooded cape. I love the face on his girl, it's so sweet! I added a large yellow rose sticker, along with a photo of a smaller butterfly. Underneath that I added a dimensional black sticker that reads Time Stands Still.  And on either side of that sticker I added a yellow rhinestone gem, to add a little sparkle.

These journals also feature straps to keep them closed, along with file pockets inside the back cover.

Giggle Fairy Altered Journal

I made some new mini altered art journals to add to the store. I wanted to add something in a different size with some simple but elegant designs, so here's the first one I came up with.

Giggle Fairy Altered Art Journal


The journal itself has a black and ivory colored design motif. I added a vintage photo of a cute little fairy girl, who appears to be trying to stifle a giggle.  I also added some rhinestone gems to the fairy's wings, along with a glittery crown. I finished it off with a metal bracket framing the word giggle, which is on some coordinating scrapbook paper.

These journals come with straps to hold them closed, and they also feature a file pocket inside the back cover, which I thought was a neat touch.

Love Altered Hearts

When I was shopping at Michael's recently, I found some flat wooden hearts that I thought would be perfect for an altered art project. I had my husband drill a small hole on either side of the hearts so I could make them into hanging hearts. I decided that Love would be my theme for this set of 2 hearts. I'm also using these for the City Crafter Challenge Blog's Heart Challenge.

Altered Art Love Hearts


I started by painting the back of each 3" heart, and the front edges, black with craft acrylics. Then I picked out two different scrapbook papers with black and white colors on them; one is a toile pattern and the other is just an ornamental pattern. I Mod Podge'd those papers to the front of each heart. Then I used copper ink on a text stamp and stamped over the middle part of the paper on the hearts. (If you click on the image, you'll get a larger view and the text will be more visible there. )

I used digital collage sheets, in inchies sizes, to find the vintage photos I wanted to use. I got these great images from Itkupilli. I backed each image with some scrap wallpaper, which I cut with paper edge shaper scissors and adhered them to the paper-covered hearts.

I stamped the words "hope" and "love" onto some grungy paper, which I also distressed a bit with some ink. I adhered those to the heart, and also added a letter "X" sticker to one heart (for kisses) and a letter "O" sticker to the other heart (for hugs). And I added a small semi-glittered butterfly sticker to each heart too. The final touch was to add some deep red ribbon to each heart for hanging.

I just love how these hearts turned out. I think I'm going to hang them in my bedroom somewhere! And I see the potential for lots of other altered hearts in the future. I'd like to find some bigger hearts too so I can do different sizes.

Dylan's Sunflower

Had to share this photograph here because I just think sunflowers are so beautiful. This one was started from seeds by my grandson, my daughter and myself (along with several others). We've been nurturing it since spring and it is now around 12 feet tall! (You'll want to click to see the full view--much prettier that way!)

Dylan's Sunflower Photo


Funny how something like this can just make you smile. Dylan can't believe how tall this sunflower got.  It's really the first one he's ever seen, so he wasn't sure what to expect. This one is the tallest of the 3 that survived our planting. We'll have to get some seeds from it and plant some more next year.

I think this would make a great watercolor painting too at some future date.  :)

What Mona Wants Altered Hang Tag

This fun little altered hangtag was made for the Famous Painters or Paintings Challenge and Gingersnap Creations.  In celebration of paint and painters, we had to create an artwork that would pay tribute to an artist or painting that we love. Well, I love Leonardo da Vinci, and one of his most famous works is the Mona Lisa. So she (and he) was my inspiration.

What Mona Wants Altered Art Tag


I started with a tag background from 7 Gypsies. Then I added a glossy image of the Mona Lisa from an old calendar. Next I tore and distressed some cardstock and adhered it at the top and bottom of the image of Mona Lisa, to serve as a frame. I stamped on the text, then I added a Fleur-de-lis sticker, some tatted lace trim, a paper rose, and a butterfly image. And I finished it off with a coordinating green satin ribbon.

C'est magnifique, no? I love how it turned out!

Imagine Altered Bookmark

It's only a paper moon,
sailing over a cardboard sea,
but it wouldn't be make believe
if you believe in me.

(Jim Reeves song, It's Only a Paper Moon)

I just had to start off with the lyrics to the Paper Moon song, since that's what I heard in my head as I was making this altered bookmark.

Imagine Altered Art Bookmark


The background is a very soft metallic, pastel green, patterned cardstock paper, which I added a decorative bottom edge to. Next I added some coordinating cardstock near the top of the bookmark, to which I stamped on the word Imagine. Next I cut out some pink butterfly wings to turn this vintage photo of a girl into a fairy. Then I adhered them to the bookmark, and added a pink roses sticker, which also has a sprinkling of glitter on it (or is it fairy dust?). I finished the whole thing with a coordinating pink satin ribbon.

I love this little vintage fairy, sitting on her paper moon. Kind of has a teensy bit of a shabby chic flair to it, don't you think?

French Fairy Altered Bookmark

Who doesn't love a pretty little bookmark? I wanted to use a vintage photo of a French woman on this one and turn her into a vintage fairy...so that's exactly what I did.

French Fairy Altered Art Bookmark


I used a turquoise blue patterned cardstock for the background. The colors seemed to go perfectly with the French femme that I added next, along with wings to make her look more like a fairy. Then it was time to embellish. I added a bit of torn and distressed contrasting paper to the top of the bookmark. And I added some distressed tag art, a sticker and a butterfly photo at the bottom of the altered bookmark. I also decided to shape the bottom edge of this bookmark, to make it a little more unique.  And I topped it off with some ivory organdy ribbon.

She does look like a French fairy, no?

Beauty Altered Bookmark

After purchasing a lovely new rubber stamp recently of a woman's face, I decided she would be the perfect subject for a new altered bookmark.

Beauty Altered Art Bookmark


The bookmark background is a piece of scrapbook cardstock that has a text design on it. I stamped the rubber stamp art image right on the background itself. Then I added some torn and distressed paper, in a soft aqua color, above and below the image. Next I added some stickers of some delicate pink roses, and finished it off with some ivory organdy ribbon.

I think it turned out so  soft and elegant looking. I love it!