Birdsong Altered Hang Tag

I created an altered hang tag for the Tag Tuesday weekly challenge, the theme of which is  Christmas Colors in July. We had to use the traditional red and green Christmas colors, but not make a Christmas tag.  So what I came up with is called Birdsong. I also decided to use this for the Get Your Craft On Tuesday weekly challenge.

Birdsong Altered Tag


Now, I didn't go crazy with the red and green, as you can see. But that is the beauty of these challenges: lots of room for interpretation and creativity! So I started with a plain manila hangtag that I then spritzed generously with a coffee-colored Glimmer Mist. I then distressed the edges a bit too with some Distress Ink. I knew I wanted to use the bird image, because he has some lovely greens in his feathers, and I found him in an old wallpaper book I had in my studio. So then I hunted around for what I wanted to surround the bird with, and I found these beautiful white flowers, with just a hint of red at the centers. They were perfect! They even have a hint of glitter on the edges, which goes nicely with the shimmer created by the Glimmer Mist. So I adhered them all to the tag, and then just to add a little something extra, I found a 3-D bee sticker to add to one of the flowers. And I finished it off with an ivory organdy ribbon.

Life's a Beach ACEO

This week, Gingersnap Creation's has Sunshine as the theme for their Random Redhead Challenge.  So I decided to make a new ACEO for the challenge, and use an altered art touch. The result is called Life's a Beach. :)

Life's a Beach Altered ART ACEO


My jumping off point was the vintage photo of the lovely beach beauty.  So I started with her and went from there. I used some illustration board for the base, which I sprayed liberally with some Glimmer Mist that I just purchased, in a coffee sort of color. Then I used a piece of wallpaper border that had a wave shape design, and cut the wave out and adhered it to the background. Next I added the beach area on the lower left, that is actually from the original image with the beach beauty. I tore it and distressed it to give it some texture and depth. Then I adhered the image of the gal to the bottom right. I added a copper-finish metal gear to act as the sunshine in the piece, along with a butterfly sticker. And I finished it off with the words Life's a Beach, which I stamped and distressed.

And you know, if I could go to a beach wearing a swimsuit like they did back in those days, I might actually go swimming! LOL

Explore Hang Tag Magnet

Now this is a simpler Hang tag Magnet I'm calling Explore. Not quite as busy as the others I've made so far, but I like the subtlety of it.

Explore Altere Art Tag

Using the small sized plain hang tag, measuring 1-1/2" x 3-1/4", I first used my usual grungy sauce mix to get the tag grungy'd up. It always creates that aged appearance that I love so much. I also used some walnut stain Distress Ink to distress the edges a bit. Then I stamped on a mesh background texture in brown ink, and added the key image in black ink on top of that; and I stamped on the word explore in black ink as well. I finished it off with the two golden-colored rhinestone gems on the key.

Dream Hang Tag Magnet

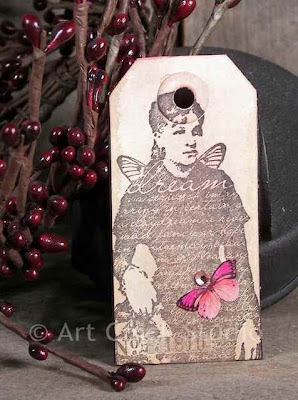
Another altered art creation as I was on a roll creating my new hangtag magnets is this, Dream Hang tag Magnet.
Dream Altered Art Tag


My 1-1/2" x 3-1/4" hang tag started out plain, but I did my usual grungy magic to grungy it up. I always like the way a grungy tag looks! I also added a bit of rose-colored Distress Ink to give it just a subtle hint of color. Then I stamped on the image of the woman, which is from Paper Artsy. She fits perfectly on the tag, don't you think? Then I finished it off with a pink butterfly photo and a pink rhinestone gem.

Paris Hang Tag Magnet

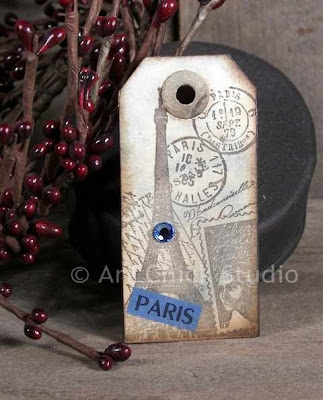
I have a fondness for creating things with a Paris theme...probably because that's one of the cities I dream about going to someday. So this Hang tag Magnet goes nicely with that theme.

Paris Altered Art Tag


Again I started with a plain hang tag measuring 1-1/2" x 3-1/4" that I grungy'd up using my special grungy sauce mix. Then I stamped on a Paris-related image using a stamp I got from Paper Artsy. I love their stamps! And this one has a definite collage look to it. I also used some blue Distress Ink here and there to give it just a hint of color (not easy to see in the picture). Then I added the Paris sticker and a blue rhinestone gem. Voila! The Paris Hangtag Magnet.

Au revoir.

Love Hang Tag Magnet

Have been busy working in the studio making art for me, and for the upcoming online store. One of things I created was something new for me: Hang tag Magnets. They are magnets made from altered hang tags. I am loving them! The first one I created is called Love. I'm also using this for today's challenge at Tag Tuesday, the theme of which is Faces.

Love Altered Art Tag


I started with a plain hang tag, which is 1-1/2" x 3-1/4", and I grungy'd that up with my own grungy sauce mix. Then I used a soft copper metallic ink and stamped on a doily design for some texture. Next I distressed the edges with some Distress Ink. Then I took an inchie size vintage photo of couple and adhered it to some distressed cardstock paper. I finished it off with the word love and a golden rhinestone gem.

I'm going to do a whole series of these...some for my new store, and some just for me (and friends!). So fun to make.

Beauty ACEO

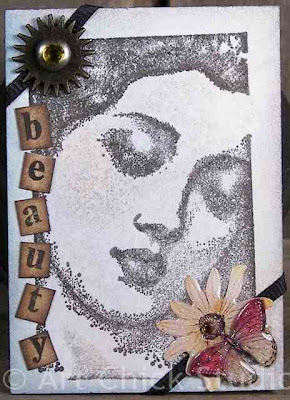
Since I'm going to start selling things on the soon-to-open Art Chick Studio Store, I've started making ACEO's (Artist Cards, Editions and Originals) instead of just ATC's (Artist Trading Cards), since ATC's are meant to be just traded, rather than sold. So this is my first official ACEO, called Beauty.

Beauty Altered Art ACEO


I started with a standard ATC-sized illustration board background. I then used some Tim Holz Distress Ink to add some hints of blue and rose over the entire background.  Next I added a rubber stamp art image of a woman's lovely face in black ink. Then I added some black, textured fabric ribbon around the opposite corners. I added a butterfly and flower sticker to the bottom right corner, and a metal gear and brad to the upper left corner. And I finished it all off with distressed letters, spelling out b-e-a-u-t-y on pieces of paper.

This turned out better than I expected actually. Now I just need to make a few more!

Passion Pretty Pouch

This is third shabby chic and sort of altered art style Pretty Pouch I made this week, and I'm calling it Passion.


Passion Shabby Chic Pouch


A plain muslin bag was my starting point, as usual. Then I stamped on a pretty image of a woman's face. I got this stamp at Michael's last week and I just love it! I also stamped on, passion. Next I sewed on some tatted-style lace trim, along with some black trim as an accent to tie in with the stamp. Then I added an ivory-colored craft rose and some matching organdy ribbon.  And I topped it off near the top of the bag with a black button and some more ribbon.

I could definitely see this pouch or any of the others being used as gift bags. It's giving me lots of ideas for Christmas too.

Believe Pretty Pouch

This is another Pretty Pouch I've made called, Believe. This one definitely has that Shabby Chic feel to it, but still has that hint of altered art too.

Believe Shabby Chic Pouch


Again I started with a simple muslin bag. I stamped on some script text using some copper ink. On top of that I added a butterfly stamp using black ink, and added the word, believe.  Then I finished it off by sewing on two different types of lace trim, and added a pink silk rose.

This is my favorite Pretty Pouch that I've made this week. One more to show you shortly!


Beauty Pretty Pouch

I've created some new things I'm calling Pretty Pouches. They are part shabby chic and part altered art, the way I see them. I love doing things with muslin bags, so I thought this would be fun for me. And I'll also be selling these in the store once we open.  This is my first one, called Beauty.

Beauty Shabby Chic Pouch


I started with a simple muslin bag and stamped on a fun image using blank ink. Then I sewed on some tatted-style lace and some ivory colored trim. Next I sewed on some burgundy colored ribbon flowers that have pearl accents. I just love this. It could be used for so many things...as home decor, as a gift bag, or just a place to put some special items you might want to tuck away somewhere.  I know I'll be making lots of these!

Imagine Altered Hang Tags

I wanted to try a little something different with my altered hang tags, and something very simple and not so busy. So I came up with this set of 2 hang tags, which I am calling, Imagine.

Imagine Altered Art Tags


These are smaller in size, measuring 3-1/4" long by 1-1/2" wide. First I distressed them some rose-colored Tim Holtz Distress Ink on the edges. Then I stamped on a neat face image. Next I stamped on the word, Imagine, and added a deep burgundy ribbon flower. And I topped them off with some black ribbon for hanging.

I really love how these turned out--not too busy or overworked. Just enough detail to catch the eye. and burgundy is my favorite color, so I always love how that looks on things. ;) Hope you like them too.

Pretty in Pink Altered Birdhouse

After having made an altered birdhouse once previously, Inspire, I was itching to make another one. So the Pretty in Pink one below is the result.

Pretty in Pink Shabby Chic Birdhouse


I wanted to keep this one looking simple, yet elegant. So almost all of the detail is on the front of the wooden birdhouse. The base is painted a very pale pink (of course). Then I used a pearlescent-looking white fluid acrylic on the edges of the roof, the base, and the birdhouse perch near the opening. I added some pretty pink patterned scrapbook paper to the roof; it has a delicate copper-looking and white scrolling pattern on it that I just loved. I also created a circle out of that paper to put around the birdhouse opening. Next I added some ivory trim to the base of the birdhouse. Then I used a chipboard accent that I painted with copper and white, and that has a shape that closely mimicked the roof paper, as a decorative embellishment for the front of the birdhouse. I added a white paper flower on top of that, which I also dry-brushed some pink paint onto the raised areas of the flower. And the final touch was some pink rhinestone gems; one is added the little perch, and one to the chipboard embellishment. And voila! Pretty in Pink, indeed.

I'll be making more altered birdhouses soon. They really are fun. They'll be going up for sale in our new store too, which I am hard at work on!

Reflection Altered Journal

This is my second altered journal that I made over the weekend. I call it Reflection.The colors are all soft tans and greens with a bit of black.

Reflection Altered Art Journal


Again I used some cardstock 12x12 paper that I cut to size and Mod Podged to the composition book cover for the background.  The background paper has a distressed and worn look about it, which I love. I then tore out a piece of another piece of cardstock paper to work as a background to my vintage fairy photo. On top of that I created yet another layer of paper, but instead of torn edges I used some paper edger scissors for a different edge effect. After gluing them all in place, I added the "reflection" sentiment. Then I added the fairy image, to make her appear to be sitting on the paper strip with the sentiment. Then I created the layered fabric flower and attached that with a brad, after punching a hole through the journal cover.

I think I may do a Halloween themed journal for the next one. I know it's early, but hey, is it really ever too early to get your witchy-ness on?!

Explore Altered Journal

Since I'm going to be opening the Art Chick Studio store soon, as I'm coming up with ideas for new art projects, I'm also always thinking about what things I can make to sell too. Just creating art feeds my soul...but selling some of my creations will be a great way to spread my creativity around (and hopefully make a little money too).

One thing I decided would be fun to create is altered journals. They'll be blank on the inside for whomever might buy them and want to use them. But I'll create the altered covers. These are just simple composition books you can buy at any department store. I created my first one this past weekend and had so much fun with it! It's called Explore.

Explore Altered Art Journal


I used some 12x12 cardstock paper for the background, which I cut to size and Mod Podged to the cover. I loved the look of this paper and the brown and turquoise pattern it has; and it looks kind of worn on the edges, which is cool.  I used a coordinating strip of paper horizontally across the cover background, then added a vintage photo of a little girl who is pulling a little wagon (she looks ready to explore something herself!). I added some chipboard embellishments at the top and bottom of the photo, and some craft flowers in coordinating colors. The final embellishment was the explore label.

I absolutely love how this turned out, and made another journal immediately afterward. I see lots of altered journals in my future!

Laugh Fairy Hang Tag

I was quite busy in the studio this holiday weekend (thank goodness!). I got a lot done. So nice to get in there and get the creative juices flowing...and just nice to actually have the time to do so! My free time is not what it once was, so I love it when I have some time to myself to get into the studio.

This altered hang tag was made for the Gingersnaps Creations Fairies Challenge. They really have some wonderful challenges at GC, and I love anything fairy-related anyway. So I was so excited to enter this particular challenge.

Laugh Fairy Altered Art Tag


I started with a tag from 7 Gypsies. They are great because they already have some background imagery on them. I distressed the tag a bit with some Distress Ink. I just love how that looks most of the time. From there I stamped on a column image for the fairy to sit on. The cute little fairy is from Art Chix Studio (again, no connection to my site--I happened upon them after getting into Altered Art, and they have some great collage sheets there!). After I affixed her I added a rhinestone gem to her bow on her dress; I also added a butterfly image, which is raised up in relief (hard to tell in the photo), a postage sticker, and I stamped on the word, laugh. Then I added some lace and the tan flower. Another touch I added was that silver-looking-doo-dad over the hole at the top of the tag. I actually found that laying on my back patio one day...something the Hubs dropped, I'm sure. So I snagged it and tucked it away. So glad I did because it was the perfect size to fit around the hole! The final touch was the ribbon at the top.

I love my little Laugh Fairy hang tag! Hope you do too.

Michael Jackson with Curls

This is my latest celebrity painting done in oils using shades of blue. It's another Michael Jackson painting. I couldn't help myself, folks. I love the King of Pop and I just felt the need to paint him again, though this time I chose a different decade.


I've always loved how Michael looked with curls, and I always loved him wearing his trademark Fedora. So that's the look I chose for this painting, which puts him sometime in the 90's here.  In my previous  MJ in Shades painting, Michael's face is from around 2007, so now I have two different portraits from two different time periods, and I just need to find a place to put them in my office. My home office has a Hollywood/Celebrity theme...so they will both fit in nicely.

OK, time for me to Beat It, Billie Jean.  ;)